

This tutorial was written by Kelli on 02/04/09.
Do not copy this tutorial and post through any kind of group or claim it as your own. Resemblance to any other tutorial is strictly coincidental.
This tutorial was written using psp 9, but should work using any version.
It is written assuming you have a basic knowledge of PSP and its tools.
Supplies:
~ font of choice,
~Tube of choice,
I am using pin up toons You can purchase this tube at CILM
~Scrap kit of choice or the one I used:
Fairy Dreams in the Winter
by Urban Mermaid Designsand can be purchased here:
by Urban Mermaid Designsand can be purchased here:
You can check out her Blog here:
Ok......Ready?
1. Open a new image500x500 White.Paste your paper of choice as a new layer.
2.Paste a frame of choice as a new layer and resize as needed.
3.With your magic wand, click inside the frame, go to selections and expand it by 2 pixels.
4.Add a new layer and drag it below the frame layer,paste a paper of choice into the selection on the new layer.
5.Leave it selected and add another new layer,go to 3-D effects ~ Cutout: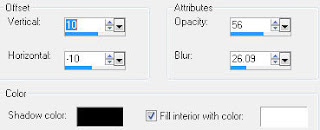
6.leave it selected and go to image, rotate the whole image X 90 Degrees twice.
7.Add another new layer and repeat the cut out.
8.Deselect.
9.Add your tube and © and watermark, and a drop shadow of choice to the tube,
I used these settingw: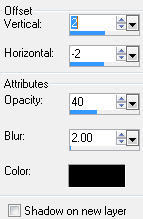
10. Add elements of choice and the same drop shadow to each element.
11. When you are happy with your tag, go to image and add a border,1pixel in a dark color of choice, I used black.
Now add another border of 5 pixels a light color from your tube,add another 1 pixel border the same color as your first one.
12. With your magic wand click inside the light border and apply any effects you would likeI did this inner bevel: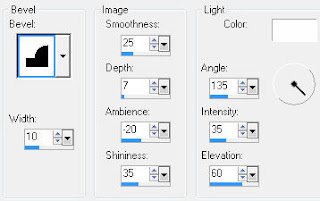
13.Add your name and the text effects you desire. And you are done!
Thanks for trying my tutorial!
Hugs,Kel


No comments:
Post a Comment