
 This tutorial was written by Kelli on 9/22/08.
 Do not copy this tutorial and post through any kind of group or claim it as your own. Resemblance to any other tutorial is strictly coincidental. This tutorial was written using psp 9, but should work using any version. It is written assuming you have a basic knowledge of PSP and its tools.
Supplies: you will need a snowflake and some present tubes
~
these Plugins:
Eyecandy 4000
Mura Miester Copies
~Tube of choice,I am using art byElias Chatzoudis You can purchase these tubes at MPT
~Scrap kit by CynthiaB:
I got the Blues It can be purchsed here:
I got the Blues It can be purchsed here:
Sweet N Sassy Digi Scrappers:
Ok......Ready?
1. Open The frame of choice,Shift+D to duplicate it,and close the original frame.Go to image and canvas size,I made mine 600 width and 500 tall.
2.Grab your magic wand, click inside the frame.Go to selections and expand X6.Add a new layer and drag it below the frame layer.Flood fill it with black.
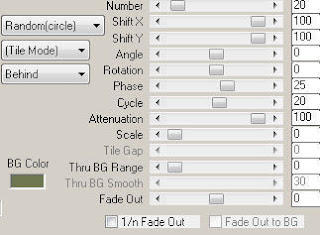
3.Open your snowflakes and chose the ones you want to use. Paste them as new layers,Duplicate and resize them as desired.Open the neat looking flowers from the kit and resize them to about 25% I did this twice. Paste them as a new layer.Go to effects, plugins and find your mura miesters copies filter.Apply the filter to the flowers,and the snowflakes.Here are my settings for these flowers:
4.Position the snowflake layers and the flower layers as desired.
5.Paste the gifts as a new image,resize it to a desired size.Duplicate it and resize again.Continue this till you have them all the way across the bottom of your frame.Merge these layers together(Only the presents)And go to adjust and colorize them as desired.This layer should be just below your frame layer,and above the snowflakes layers
6.Paste the elements of choice,and resize them and position them as desired.Add your tube at this time and add a drop shadw.
7.Add your appropriate ©and watermark now so ya dont forget.I have to do it early or I forget...lolI'm gettin old.
8.Add a drop shadow to each element layer and to the frame layer.
9.Add your text.I did this in 2 layers.The first layer I typed in"If there is love in your heart...And your mind." And convert that layer to raster after you are happy with it. In the next layer type"You will feel like Christmas all the time." And convert to a raster layer when you are happy with how it looks
10.Go to effects,plugins and eyecandy 4, grad. glow.Here are my settings: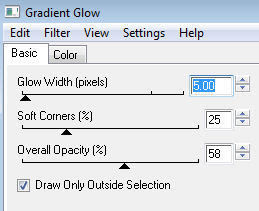
11. Are you happy with how your finished tag looks?If so its time to animate.
12.Hide the last text image,copy merged and paste it in animation shopas a new animation.Duplicate that frame,Until you have 5 of it.
13.Go back to psp, (and this next step you will repeat till you have got your opacity set at 10 %)Lower the opacity to 90,copy merged. Go back to animation shop and make sure the last frame of your animation is active and paste after current layer.
14. Repeat this step,lowering the opacityof that text layer by 10% each time, till you have your opacity at 10%.
15.When the first text layer is at 10% Unhide the other text layer, so you have them both set at 10%. Copy merged and paste in animation shop after current layer.
16.Now go back to psp and hide the first text layer and increase the other text layer to 20%.Copy merged and paste in animation shop after current layer.
17.Repeat this step until your text layer is at 100%.Copy merged and paste in animation shop after current layer.
18.Duplicate this layer until you have 5 of it.(you should have about 20 layers now)
19. Go to edit and select all.Go to animation and set the speed at 30.Make sure all is selected and copy.
20. Paste as a new animation andgo to animation and reverse frames.Now select all and copy.
21.Go back to your first animation and click on the last frame.Paste after current layer,You will have about 40 frames.
22.View animation and if your happy with it, Save it.
Thanks for trying my tutorial!
Hugs,Kel


No comments:
Post a Comment