
This tutorial was written by Kelli on 9/05/08.
Do not copy this tutorial or post through any kind of group or claim it as your own.
Resemblance to any other tutorial is strictly coincidental.
This tutorial was written using psp 9, but should work using any version.
It is written assuming you have a basic knowledge of PSP and its tools.
Supplies:
~You will need a plug in for this tut: Xero's Fritillary
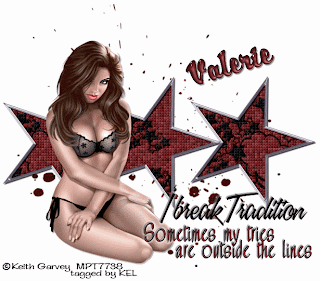
~Tube of choice,I am using the artwork of Keith Garvey
You can purchase his tubes at MPT
~Font of choice
~Word art or phrase of choice.If you would like to use mine here it is:
 ( just right click and save to your computer )
~The Scrap kit of choice or this one by Baby V Designz Its called Midnight Merlot.You can check out her blog here:
http://babyvdezign.blogspot.com/
k......Ready?
1. Open supplies in pspMinimize them for now.Open a new canvas 700X700~ White.
2.Open the star frame of choice,Grab your magic wand and click inside each star.
Go to selections and modify Expand X 2 pixels.
3.Open a paper of chioce.Resize it to 700 pixels.Then go to your color pallette,Choose pattern there and select your paper from the menu.I scaled my pattern at 100.
4.Add a new layer below the frame layer,Fill your selections with the pattern.Select none.Now duplicate the pattern layer twice.So you have 3 pattern layers.
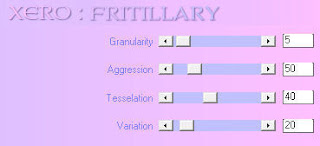
5.Go to effects,Xero and find the Fritillary filter there.On the first pattern layer, use the filter with these settings:
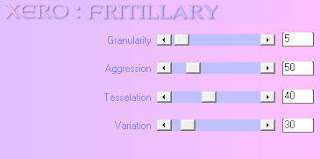
6.Hide the layer you just did the filter on andmake the next patterned layer active.Use the filter again with these settings:
 7.Hide that layer and make thebottom patterned layer active.Use the filter again with these settings:
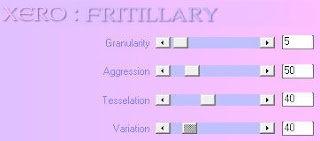 8.Make the background layer the active layer,Paste the Glitter Splat as a new layer,below the pattern layers.Resize it by 85%.Repeat the resize if desired.
 9.Add your tube as the top layer.Add a drop shadow to it these are the settings I used:
h and v = 2, opacity 30 and Blur 2
10. Make your frame layer the active layer and repeat the shadow on that layer as well.
11. Add elements,Word art, or text of your choice.Dont forget to add appropriate © and your watermark.
At this time also add your name and any text effects you desire.
12.Hide the bottom 2 pattern layers,And copy merged.Paste into animation shop as a newa nimation.
13.Go back to psp and hide the first patterned layer,unhide the middle one and copy merged.Go back to animation shop and paste after current layer.
14.Go back to psp and hide the middle patterned layer, unhide the bottom pattern layer and copy merged,Back to animation shop and paste after current layer.
15.View animation and save.
Thanks for trying my tutorial!
Hugs,Kel


No comments:
Post a Comment