

This tutorial was written by Kelli on 7/01/09.
Do not copy this tutorial and post through any kind of group or claim it as your own.Resemblance to any other tutorial is strictly coincidental.
This tutorial was written using psp 9, but should work using any version.
It is written assuming you have a basic knowledge of PSP and its tools.
Supplies Needed:~Tube of choiceI used
Elias Chatzoudis You can purchase a license to use his tubes from MPT
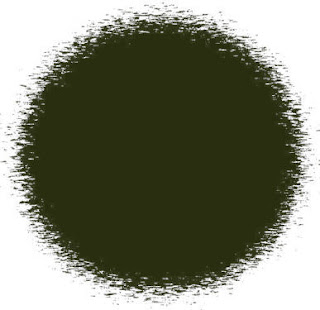
~Round mask of choice, or the one I used :
~2 Fonts (a fat font and a scripty font) of choice
~word art or a quote of choice
~Scrap kit by Designs by Brandi
its called Stars and Stripes you can purchase her kit here: http://sweetnsassydigiscrappers.com/store/index.php?main_page=product_info&cPath=1_27&products_id=336
Ok......Ready?
1. Open a new image 500x500 ~
2.open a paper of choice,resize it to 500X500 pixels.
Load mask, Merge group.
3.Copy and paste it as a new layer.
4.Resize it if desired, i did x 85%.
5.paste your tube as a new layer, resize if needed.
6.Grab your dropper tool to choose a olor from your tube.
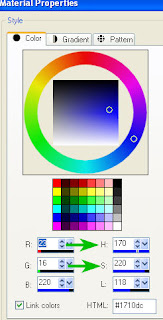 7.Click on the color in the layer pallettenote the H and S numbers, Go to adjust Hue and saturation colorize and insert those numbers.
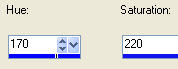
8.Open one of the stars, resize it x 35% repeat if desired, go to adjust, add noise, amount set at 50 monochrome selected, and random selected.
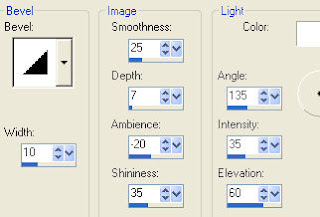
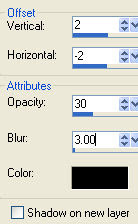
9.Add an inner beve, and a drop shadow.with these settings:
10.Duplicate and resize it x 85% Duplicate the smaller star and resize it again.Position the 3 stars.Merge them so they are on the same layer.Duplicate this layer 3 times and position as desired.merge all the star layers till your happy with them,duplicate it again, and move it up slightly.
11.Now we are gonna colorize again.Colorize one star layer with the settngs you used on your maska nd choose another color from your tube to colorie the other star layer, I mae one of my layers the blue i used in the mask
and the other layer red.
12.paste the rope bow as a new layer,and rag it below yor star layers, add the same inner bevel and colorize it a color to match your tag, i did it the same blue.Add the same drop shadow.
13. Add copywright and your watermark.
14. Grab Text tool, Set fg black, stroke 2.And set the bg to a color from your Tube.Type your name, in a fat font, I used showcard gothic size 48. Convert it to a raster layer, Use your magic wand to seect inside all your letters. Contract the selection x 2 and add noise as before
and the same innner bevel.Select none and ad the same drop shadow.
15.Choose another font, set the fg null and the bg black and type "I pledge Allegiance"convert it to a raster layer and add your favorite text effects.
16.if you made a white layer delete it before saving it as a png.
Thanks for trying my tut!
Hugs,
Kel
Thanks for trying my tutorial!
Hugs,Kel


No comments:
Post a Comment