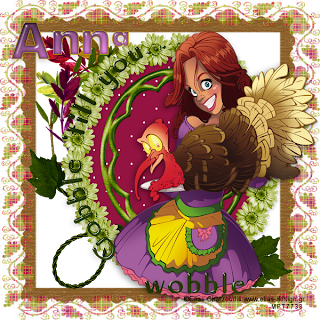
This tutorial was written by Kelli on 11/20/09.
Do not copy this tutorial or post through
any kind of group or claim it as your own.
Resemblance to any other tutorial is strictly coincidental.
This tutorial was written using psp 9,
but should work using any version.
It is written assuming you have a basic
knowledge of PSP and its tools.
Supplies Needed:
~ The Scrap kit By Mystical Designs
called "Thanksgiving Boquet"
Im sorry I dont know where it is being sold now.
So sorry that I dont have her blog link
if anyone nows it please leave it here so I can link the tut
Thanks!
~A tube of choice.I used a tube byElias Chatzoudis.
You need a license to use his work You can purchase one at MPT.
~Fonts of choice
~My supplies.
You need a license to use his work You can purchase one at MPT.
~Fonts of choice
~My supplies.
I dont know where I got these two masks.if they are yours please contact me at purplehearts@live.com
so that I may credit you or take them down
Ok......Ready?
1. Open a new image 600 x 600 pixels.
2.Open 2 of your papers,Copy one of them and paste it as a new layer
and copy and paste the other one on top of that one as a new layer.Load the frame mask on the bottom paper layer,merge group.
now load the grapevine mask on the second paper layer.
merge group.you may want to
resize one or both of the mask layers.
3.Now paste one of the circle frames as a new layer.
position it in the center and resize as needed.
Grab your magic wand and click inside the frame layer, you may have to click more than once to get it all selected,
modify the selection by expandng it x 5.
Add a new raser layer below the frame layer, open another paper and copy it, paste it into the selection on the new layer, select none.
4.Add some more elements from the kit, add a drop shadow to each.
5.Grab your elipse tool, background null, doesnt matter what color foreground is.draw a circle the size of the frame.
6.now grab your text tool and move your mouse over the elipse, till you get the symbol of an A with a line under it.When you see that you can start to type your saying. I typed "Gobble 'till you wobble",Just use your imagination to think of saying.A patient I used to take care of used to tell me that starting a week before thanksgiving,lol.
When you are happy with what you have typed,go to your layer pallette and click the + sign beside that layer, now hide the elipse.you should only see the text now.Convert it to a raster layer.
7.Add your name and any text effects you would like now.
8.Save it as a png.
Thanks for trying my tut!
I hope your happy with your results!
Hugs from Kel
Hugs from Kel












No comments:
Post a Comment