

This tutorial is my first using psp X2, but should work using any version.
It is written assuming you have a basic knowledge of PSP and its tools.
This tutorial was written by Kelli on 3/17/08.
Do not copy this tutorial or post through any kind of group or claim it as your own.
Supplies Needed:
~A Scrapkit of choice or the one I used, its
from Scrappy Lippy and is called
Pretty in Pink. You May Purchase it here:
http://sweetnsassydigiscrappers.com/store/index.php?main_page=product_info&cPath=1_36&products_id=352
you can check out her blog here:
http://scrappylippydesigns.blogspot.com/
~Tube or Tubes of choice (if desired,I simply used the wonderful kit)
~Font of choice I used ithe font called - Kinkee
~ Eyecandy 4
~GlassXenofex 2~Constellation
Ok......Ready?
Open the font on your desktop.
1. Open a new image 600x400~WHITE.
2.Grab your Text tool.Font Kinkee, Size 72.Line width 2. F/G color of your choice(I chose a gold graduate) B/G Paper of your choice.(You will need to reize the paper, and set it as a pattern in your back grounds color box) Type out your name.
Objects align in center of canvas.
Useing the nodes pull out and up making the name cover most of the canvas.
Once happy with it, convert to rastor layer.
3.Grab your magic wand set to Add/Shift.
Click on the inside of the name.(depending on which paper you choose,you may have to click several times to get it all selected.)
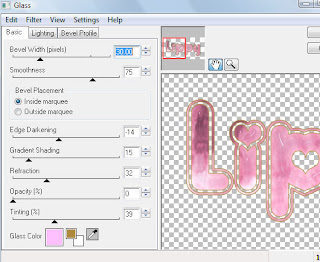
4.Go to effects and choose Eyecandy 4~ glass withthese settings:
Deselect.
5.Grab your magic wand again.Zoom out on your imageso it will make it easier to select.
Select all of the outline of the name that you didnt select before.
once it is all selected, duplicate that layer twice so you have 3 name layers.
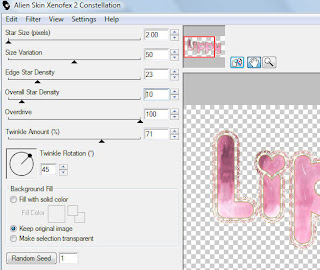
6.Make the first duplicated layer the active layer. Go to Xenofex2~constellation and use these settings:
DO NOT DESELECT.
7.make the next name layer active and go to constellation again.
Click the random seed button one time.then apply.
8. Go to the next name layer and apply the constellation filter again. Clicking the random seed one time.Now you can Deselect.
9.Add a drop Shadow to each name layer.
I used 2,2,50,2,Black.10.Make the background the active layer and add a new rastor layer. Choose a color of choice or another paper of choice, which is what I did.Fill the new layer with the paper or color you choose.
Resize the layer by about 70%
10.Go to effect, Texture effect and choose a texture of your choice.I used the Mosiac Antique.And I did the effect twice.
11.Next Add any embellishments from the kit.I choose the beautiful rose and a bow.I duplicated the rose several times and mirrored some of them and rotated some of them.And reduced the opacity of them to 60.So the name would still show.
12.At this point Add your watermark and any Copywright information that applys.
~~~~~~~~~~~~~~~~~~~~~~~~~~~~~~~~~~~~~~~~~~~~
Now...........The fun part.lol
Open Animation Shop
13.Click the eye on the second and third name layers.
copy merged.Go to animation shop and paste as a new animation.
14.Back in PSP click the eye on the first name layer and unclick the eye on the second name layer go copy merged.Go to animation shop and paste after current frame.
15.Go back to psp and hide the second name layer and unhide the third name layer.Again go copy merged.And go back to animation shop for the last time.Paste after current Frame.
Now.....All you have to do is view your animation and save it.
Thanks for trying my tutorial!
Hugs,Kel


No comments:
Post a Comment