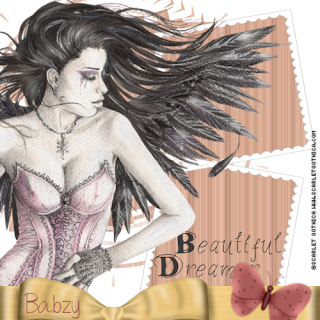
This tutorial was written by Kelli on 11/08/09.
Do not copy this tutorial or post through any kind of group
or claim it as your own.
Resemblance to any other tutorial is strictly coincidental.
This tutorial was written using psp 9,
but should work using any version.
It is written assuming you have a basic knowledge
of PSP and its tools. Supplies Needed: ~ The Scrap kit By Babzy's boutique
called "Golden Bown"
it Can be purchased HERE
you can check out her blog HERE
~a tube of choice
~Font of choice
~A mask of choice
Ok......Ready?
1. Open the scalloped frame from the kit,resize it to 30x300 pixels .
1. Open the scalloped frame from the kit,resize it to 30x300 pixels .
2. Open a new transparent image, 500x500.
Past your resized frame as a new image,Rotate it x 10 to the right.Position it in the top right hand corner,
Duplicate it and mirror it.
Now positin the two frames one on top of the other.
Refer to my tag if desired, or position them in your own way.
Once you have them as desired,
open a paper of choice, or use a pattern of choice.
Copy it.Go back to your working image, grab
your magic wand and click inside one of the frames,
add a new raster layer below the frame layer,
paste into selection.
Select none. Duplicate your paper layer,
mirror and position it inside the other frame layer.
Copy and paste it as a new image. Close the original.
3.Open one of the ribbons and resize it to 500 pixels wide.
4.Open your tube. copy and paste it onto your paper tht you cropped, a large tube will work best.Merge visible and go to effects, image effects, offset set the vertival at 0and the horizontal as far to the right as it will go.so you have a nice striped pattern.
5.Open one of the butterflies, resize as desired, paste it onto
your working canvas, add a drop shadow of choice.
6.Now paste your tube onto your working image arrange it just above your frame layer, add a drop shadow of choice.Add your copywright info now.
7.Now grab Your text tool and type your text
6.Now paste your tube onto your working image arrange it just above your frame layer, add a drop shadow of choice.Add your copywright info now.
7.Now grab Your text tool and type your text
along with whatever text effects you like.
8.Use a different font to type your name and add your favorite text effects to it.osition it as desred
8.Use a different font to type your name and add your favorite text effects to it.osition it as desred
9. Open another paper and resize it to 500 pixels,
copy and paste it onto your working image as a new laywe,
drag it to the botttom of your layer pallete,
apply your mask and merge group
Position the mask in the left upper corner.
10. When happy with everything save it as a png.
Thanks for trying my tut
Hugs from Kel















No comments:
Post a Comment