
 This tut was writtenby Kelli August 27, 2006
Resemblance to any other tutorial is strictly coincidental.
Do not copy this tutorial or post through any kind of group or claim it as your own.
This tutorial was written using PSP9,but should work using any version.It is written assuming you have a basic knowledge of PSP and its tools.
This Tutorial uses no outside filters.
The only thing you need is psp and animation shop,
~A tube and font of your choice and a mask of choice.
The only thing you need is psp and animation shop,
~A tube and font of your choice and a mask of choice.
Ready to get started?
Open your tube and font.
1) open a new canvas 400x400, Transparent.
2) Choose 2 colors from your tube for your foreground and background.
3) flood fill the canvas with your f/g color
4) Go to layers new raster layer and flood fill it with the b/g color.
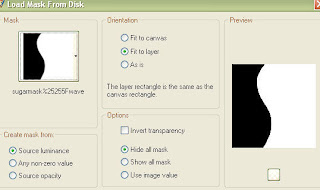
5) While on raster 2 go to layers,load mask from disc and select a mask from the drop down menu settings are:
6)go layers merge, merge group.
7) Layers merge visible.
You now should have only one layer.
With your magic wand Click on one of the sides of your canvas.
8) Duplicate your layer twice so you will now have 3 layers.
9) click on the bottom layer on your layer pallet and go to adjust, add or remove noise,add noise with these settings:
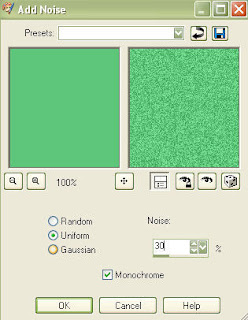
10) go to the next layer and add noise this time changing to 33, All other settings stay the same.
11) go to the next layer and add noise again this time changing the setting to 36. and leaving the other setttings as they are.Now we will add a frame so it looks more finished
12) layers, add a new raster layer.flood fill it with your darker color.Selections select all Selections modify contract by 15 then hit delete on your key board then go selections invert selection.
13) Add an inner Bevel with these settings:select none.
14) At this point you should haveyour three mask layers and one frame layer.Duplicate your frame layer twice so you have 3 frame layers.
15)Hide 2 mask layers and 2 frame layers.Merge visible the other 2 layers.next hide the merged layers and unhide one mask and one frame layer.Merge visible these two layers.Again hide the merged layer and unhide the last mask and frame layer.Merge visible these two layers.Now you should have 3 merged layers.It may help to rename them Mask 1,2, and 3.
16) Copy and paste your tube as a new layer.Add a drop shadow with these settings:
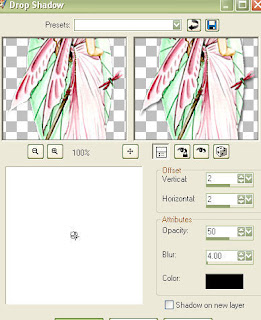
17) Repeat the drop shadowthis time change the H&V to -2.
Now To add text. I used Water lilly with these settings:
create as Vector, Direction = Vertical and down,Stroke width 1,Kearning -525.19) Type your first letter and apply Then type the rest of the letters using the nodes to stretch or contract it until it is as you want it.
create as Vector, Direction = Vertical and down,Stroke width 1,Kearning -525.19) Type your first letter and apply Then type the rest of the letters using the nodes to stretch or contract it until it is as you want it.
18) Convert to raster.
19) go selections select all Selections float selections defloat selections modify contract by whatever your stroke width was. mine was 1 so I contracted the selection by 1.
20)Apply the same inner bevel as we used before and the same drop shadow
23)You should have these layers:
Text
Tube w/©
Mask3
Mask2
Mask3
Text
Tube w/©
Mask3
Mask2
Mask3
21) Hide mask 2 and 3 Make sure your text layer is active.Go Copy merged.
22) Open animation shop and paste this as a new animation.
23) Go back to psp and hide mask 1 and unhide mask 2.Copy merged.
24) Go back to Animation Shop and paste it after current frame.
25) Again go back to psp,and hide mask 2 and unhide mask 3.Copy merged.
26) for the last time go back to animation shop and paste after current frame.
27)View animation and save.
Thanks for trying my tutorial!
Hugs,Kel


No comments:
Post a Comment