
This tutorial was written by Kelli on 4/9/08.
Do not copy this tutorial or post through any kind of group or claim it as your own.
Resemblance to any other tutorial is strictly coincidental.
This tutorial was written using PSP9, but should work using any version.
It is written assuming you have a basic knowledge of PSP and its tools.
Supplies Needed:
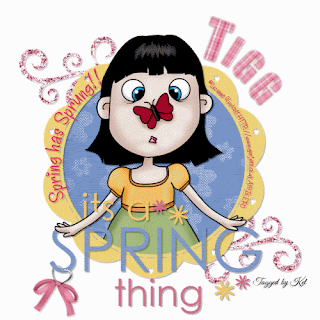
~The Scrapkit I used is from Misfits scraps by Missy and is called Its a Spring Thing.
Please check out her site here:
http://uk.groups.yahoo.com/group/misfitsscrapz/
~Tube of choice. I used Suzanne Woolcott You can purchase a license for her work from AMI
~Font of choice
~DBS FLUX ~ Bright noise
Ok......Ready?
Open your supplies in psp, minimize for now.
Open a new canvas 500x500~White.
1.Copy and paste Frame 2 as a new layer.Resize and position in the center of the canvas.Add a Drop Shadow of choice.
2.Grab your magic wand tool.Click inside the frame.Go Selections and modify~expand selection by 5. Choose a paper Resize, and copy and paste as a new layer. Drag it under the frame layer. Go to Selections and invert selection,now hit delete on your keyboard.
3.Copy and paste your selected tube as a new layer.Resize and position.Add a drop shadow.
4.Add the spring word art and a drop shadow.
5. Open the doodle of choice.Resize and copy and paste as a new layer.Drag below the paper layer,And position.Duplicate it and flip, then mirror.position the layers as desired.Merge the doodle layers.
6. Add any other elements you would like.And a drop shadow of choice.
7.Grab your preset shapes tool.Set to Elipse.Show nodes and create on vector both checked.Stroke width 5, B/G color null.F/G color black. Go to objects, align, center in canvas.Use the nodes to shape and position so that it is even with your circle frame layer.DO NOT CONVERT TO RASTER YET.
8. Now grab your text tool.Move your mouse to the elipse.You will see an X with an A by it.At this time type your text.If you did it correctly it will be curved around the elipse.
9. Now over on your layer pallet there is a + beside the vector layer.Click that you will see different layers there.Hide the elipse layer.
NOW YOU CAN CONVERT TO RASTER LAYER.
Add a drop shadow to your text layer.Dont Forget to add appropriate © at this time and your watermark if desired.
10.If you are not animating...Add a drop shadowto your doodle layer.(If your animating do not add the shadow yet)
11.Add your name and any effects you desire.or use the alphabet that comes with the kit.
12.Now your done, hide the bottom layer and Save as a png.
If you are animating...Come with me.lol
13.Duplicate your doodle layer twice.
14.On the first doodle layer,go to effects, DBS FLUX~Bright noise intensity set at 48 Hit mix once.
15.Go to the Second doodle layer and repeat the Bright NoiseBut hit Mix twice.
16.On the third doodle layerDo the bright noise three times.
17.Hide the bottom two doodle layers.Copy merged all visible layers.
18.Open Animation Shop and paste as a new animation
19.Go back to psp,Hide the first dooodle layer and unhide the next doodle layer.Copy merged Go back to animation shop and paste after current frame.
20.Once again back to psp and hide the second doodle layer and unhide the last doodle layer copy merged and paste after current frame in animation shop.
21.View your animation and save. And now your done!
Thanks for trying my tutorial.
Hugs,Kel


No comments:
Post a Comment