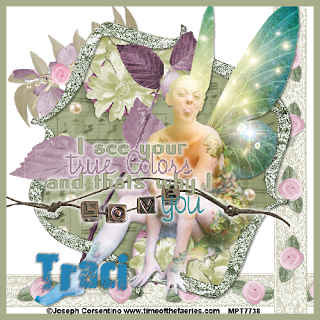
This tutorial was written by Kelli on 11/14/09.
Do not copy this tutorial or post through any kind of group
or claim it as your own.
Resemblance to any other tutorial is strictly coincidental.
This tutorial was written using psp 9, but should work using any version. It is written assuming you have a basic knowledge of PSP and its tools.
Supplies Needed:
~ The Scrap kit By Horsedreamn Designs
called "Holding Hands"
it Can be purchased HERE
you can check out her blog HERE
~A tube of choice.I used a tube by
Joseph Corsentino . You need a license to use his work
You can purchase one at MPT
~Fonts of choice
Ok......Ready?
1. Open a new image 500 x 500 pixels.
2.Open one of the glitter frames resize it to 900 pixels on the largest side then resize again this time by 50%, paste it onto your new canvas as a new layer.
3.Open a paper of choice, resize it to 900 pixels.copy and paste it onto your new canvas as a new layer,grab your magic wand and click inside the frame. Expand the selection by 3, invert selection, make paper layer the active layer and hit delete on the keyboard to get rid of the excess paper.
4.Open the beads tube, resize to 900 tall copy and paste it as a new layer right on top of the paper layer, position it as desired, duplicate it and mirror it position both layers as desired and merge them together.Activate one of the frame layers, grab your magic and tool and click outside the frame.Now activate the beads layer again and hit delete on the keyboard again to get rid of the beads that are outside of your frame.
5.Open the flower lace and resize it by 50% paste it as a new layer, drag it to the bottom of the layer pallete,now duplicate it and rotate the duplicate by 90 degrees to the left.Position it at the bottom.
6.Open the branch with beads, resize it by 50% twice, rotate it to the left by 20 and paste it as a new layer in the top left corner,or wherever you would like it.
7.Open flower 1, resize it by 50% twice. Copy and paste it as a new layer. Move it to the top so you can see what your doing to it.Add a drop shadow of choice my settings are 2,-2,38, 3.Resize it again, this time by 75%Duplicate and resize the duplicate by 85% position it as desired to make your flower cluster, now duplicate and resize again.Position it in your flower cluster.Merge the 3 flowers and drag the layer just below your frame layers,activate one of the frame layers and grab your magic wand again and click outside the frame and activate the flower layer again, hit delete on your keyboard.select none and duplicate the flower layer, mirror and flip.position as desired.I also added button 2 under the flower clusters to add more color.
8.Open the branch 3 resize it as the other elements and paste it as a new layer on top of the paper layer. Use the freehand selection tool to select the part of the branch you want on top of the frame. While it is selected right click on the branch layer on your layer pallette. Promote selection to layer.Now make the branch layer active again and hit delete on your keyboard. Select none and drag the promoted selection above the frame layers.
9. Add any elements you wish,
Add a drop shadow to each.
10.Paste your tube layer and add your © info now.
11.Grab your text tool and type a quote of your choice
I typed "I see your true colors, and thats why I love you"
But I used the love word art instead of the word love."
Use a couple of fonts to really make the text
stand out.
12. Add your favorite text effects now.
13. Type your name in a different font and add the text effects you want
I only did a drop shadow on the name.
14.Add a new layer and arrange it to the top of the layer pallette.Select all, go to selections and contract the selection by 10. Invert the selection.Fill the selection with a color from the tag.Select none.
Save it as a png.
Thanks for trying my tut!
I hope your happy with your results!
Hugs from Kel















No comments:
Post a Comment