
 This tutorial was written by Kelli on 6/29/09.
Do not copy this tutorial and post through any kind of group or claim it as your own.
Resemblance to any other tutorial is strictly coincidental.
This tutorial was written using psp 9, but should work using any version.
It is written assuming you have a basic knowledge of PSP and its tools.
Supplies Needed:
~Tube of choiceI used the graphic from the kit
~Font or fonts of choice
~Scrap kit by Sassy's imagination
Called Pamper Momma
you can purchase her kit here:http://sweetnsassydigiscrappers.com/store/index.php?main_page=product_info&cPath=1_74&products_id=2904
you can purchase her kit here:http://sweetnsassydigiscrappers.com/store/index.php?main_page=product_info&cPath=1_74&products_id=2904
~you will also need my word srt, or you can make your own:

Ok......Ready?
1.Open 2 papers.Shift+D to duplicate.Resize your solid paper to 600x600.
2.Grab your Rectangle tool stroke width set at 5. Make the f/g a solid color to match your tube or second paper. Draw a rectangle 100 x 500.
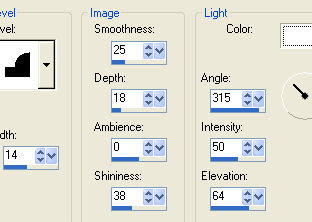
3.Give it this inner bevel:
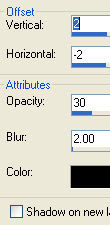
and then give it thisdrop shadow:
4.Duplicate it and flip it.
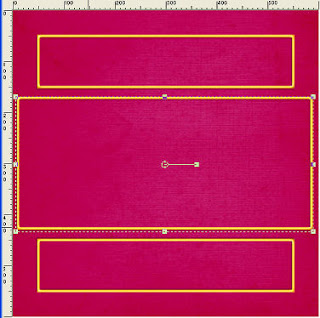
5.Draw another rectangle longer and fatter than the other two.position it in the middle of your two smaller ones.Repeat the inner bevel and Drop Shadow fom before.
Merge the three rectangles ,when they are positioned like you want them.
6. Grab your Magic wand and select inside each square,
should look like this:
you can see in the screen shot that i used the raster deform tool to make the rectangle longer.
7.Expand selection x 4.Copy your second paper, this one should be a pattern of some kind,add a new raster layer and drag it below the three rectangle layer. Now, paste into selection.
8. Go to Effects, texture effects, antique mosaic (default settings)Select none.
9.Draw a large square same setings as before.
10.Repeat the inner bevel and drop shadow from before.Duplicate it,on the originalone, grab raster deform tool and stretch it till it is longer, and narrower than the top square, refer to my tag.
11.make your top square the active layer,grab the magic wand, click inside the square, expand again.
12. Add another new raster layer, paste the patterned paper into selection, drag this layer below your top square,select none merge down.
13.Make the second square layer active, repeat above, but fill it with the first paper,merge down, and selet none.
14.make bottom layer active,select all, contract x 10 invert the selection
15.Add a new layer, fill selection with color of rectangles leave selected, repeat the inner bevel and drop shadow again. select none, move this layer to the top.
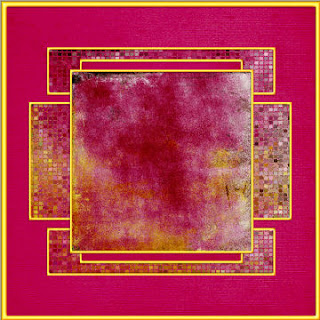
16.this is what you should have now:
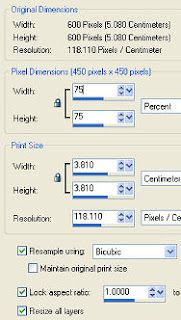
17Resize your tag with these settings:
18. Now just add your elements an tube, I gave them all the same drop hadow as before.
19. Be sure to add appropriate copywright.
20.Now just add the word art and your name, with the text effects you like.
I did the same inner bevel and drop shadow as before.
21. Save it as a jpeg. and your done!
Thanks for trying my tutoral!
Hugs,
Kel


No comments:
Post a Comment