

This tutorial was written by Kelli on 07/03/09.
Do not copy this tutorial and post through any kind of group or claim it as your own.
Resemblance to any other tutorial is strictly coincidental.
This tutorial was written using psp 9, but should work using any version.
Do not copy this tutorial and post through any kind of group or claim it as your own.
Resemblance to any other tutorial is strictly coincidental.
This tutorial was written using psp 9, but should work using any version.
It is written assuming you have a basic knowledge of PSP and its tools.
Supplies Needed:
~Tube of choiceI used Marjolein Gulinski
Supplies Needed:
~Tube of choiceI used Marjolein Gulinski
You must purchase a license to use this tube. You
~And a mask of choice.I used one from Masks by Simone. I cant provide you with the mask but I can link you to her site. I used Mask number 9. you can download it here:
http://www.sophisticatsimonepsptutorials.com/Masks-Downloads/masks.html
Its in the first download.
Ok......Ready?
http://www.sophisticatsimonepsptutorials.com/Masks-Downloads/masks.html
Its in the first download.
Ok......Ready?
1. Open a new image 500x500 ~transparent.
2.Add a new Raster layer.Flood Fill itwith a color from your tube.
2.Add a new Raster layer.Flood Fill itwith a color from your tube.
3.Go to layers, new mask layer and choose the mask from the drop down menu.Load the maskMerge group
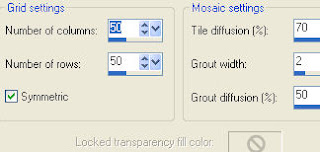
4.Duplicate the group layer.With the duplicate layer the active layer Rotate 90 degrees, and drag it beneath the group layer.then go to effects Mosaic antique:
4.Duplicate the group layer.With the duplicate layer the active layer Rotate 90 degrees, and drag it beneath the group layer.then go to effects Mosaic antique:
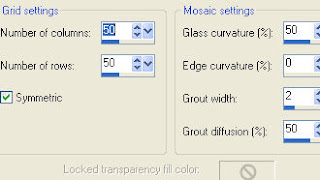
then go to effects again and apply mosaic glass:
5.Add a drop shadow of choiceto both mask layers,resize the top mask layer by 85%. Lower the opacity on the original mask layer to 30. and the copy to 50.
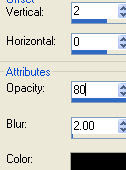
6.Open the hearts tube, Paste the hearts as a new layer and add a drop shadow:
Duplicate it and mirror it, position the two layers around your tube till you are satisfied, it should look like a circle or oval when you are finished.
7.Paste your tube as a new layer.Add the drop shadow from before.
8.With your preset shapes tool,set to elipse.Your foreground color black,background null.Stroke width set at 2,draw a circle,a little smaller than the mask layers.While it is still a vector,Grab your text tool andyour chosen font.Move your mouse over the elipse,until you see the A with the half circle under it.Type your text and apply.
Use the nodes to position it,when happy with it,click on the + sign beside itin the layer pallette.It will open to reveal 2 layers.Hide the elipse layer.
9.Now for the gel effect on the text.I love this effect....here they are:
inner bevel:
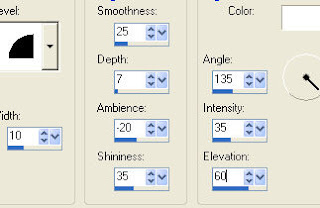 add noise Amount 39 Monochrome and uniform checked.
Then repeat the inner bevel agin and the drop shadow from before.
10.Add the bow that i have
included in the zip, and the other elements of your choice.
And a drop shadow of choice,to each element.
11.At this point Add your watermark and any copywrights that are needed.
12.if you made a white background, delete it before saving as a png.
Thanks for trying my tutorial!
Hugs,Kel


No comments:
Post a Comment