
 This tutorial was written by Kelli on 8/22/08.
Do not copy this tutorial or post through any kind of group or claim it as your own.
Resemblance to any other tutorial is strictly coincidental.
This tutorial was written using PSP9,but should work using any version.It is written assuming you have a basic knowledge of PSP and its tools.
Supplies Needed:~Tube's (4) of choiceI am using the wonderful workOf Jennifer Janesko.
You an purchase her tubes at CILM
~font of choice
~Mask of choice...A round one will work best
The Scrapkit I used is from Urban Mermaid and is called Scraps in the City_Sam
You May Purchase at:
http://sweetnsassydigiscrappers.com/store/index.php?main_page=product_info&cPath=1_30&products_id=87
Check out her blog here:
The Urban Mermaidhttp://urbanmermaiddesigns.blogspot.com/
This tutorial uses no outside filters
Ok......Ready?
open all supplies in psp, minimize for now.
1. Open a new canvas 600x600, White.
2. Open the frame and resize it by 50%.Copy and paste it onto your new image,Resize again if needed.Sharpen x 1.
3.Resize your first tube,Paste it as a new image,and position it below your frame layer,so that the face is where you want it,Make your frame layer your active layer.Grab your magic wand and click inside the first square.Go to selections and modify the selection x 3.Make your tube layer the active layer and go selections invert.Hit delete on y our keyboard and select none.Repeat with the remaining 3 tubes.
4.Add the following drop shadow to the frame layer:
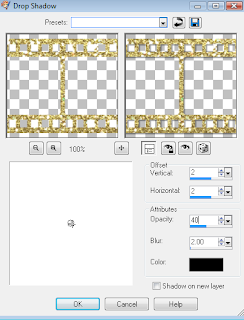
5. Add the same drop shadow to your tube layers,Except change the settings for h and v to -2.
6.With your selection tool, set to rectangle.Draw a rectangle the size of the inner part of your frame.Add a new layer and flood fill it with the color of your choice.Or a paper of choice.Select none.Now merge the frame,Tubes and the colored layer.
7.Duplicate the frame layer androtate it to the left x
10.Duplicate the original frame layer and rotateit to the right x
10.Position all 3 frames as desired.
8.Open a paper of choice,risize it to fit your image.Paste it as a new layer.Load the mask of choice.Merge group and position it as desired.
9.Add your doodle and colorize as desired.I made it black to set off the gold and red.Resize it as needed and sharpen x 1.Dupliate it and flip.Positon both layers as desired.
10.Add your name and any effects you would like.
11.Add your © and watermark at this time.
12.Open the kiss and resize it x 50%.Sharpen it and paste it as a new layer.Position it as desired.Duplicate it and resize it by 85%.Sharpen it x1.Go image and mirror.Position it as desired.Duplicate that layer and resize it again.Sharpen it and mirror it.Position it as desired.
14.Hide all the kiss layers and copy merged.Open animation shop and paste it as a new animation.Go to edit and duplicate selected.Go to edit again and select all.Duplicate selected again so you have 4 layers.Now click on the 4th layer.
15.Go back to psp and unhide the first kiss layer.Copy merged and paste in animation shop after current layer. 16.Go back to psp and unhide the next kiss layer,Copy merged and paste in animation shop after current layer.
17.For the last time go back to psp and unhide the last kiss layer.Copy merged and paste in animation shop after current layer.Then paste it again 3 more times.
18.Go to edit and select all.Go to animation and animation properties.Set the speed to 30.
19.Play the animation and if you are happy with it save it.
Thanks for trying my tutorial.
Hugs,Kel


No comments:
Post a Comment