
 (To see the animation click the tag it will take you to the image in my photobucket)
This tutorial was written by Kelli on 10/20/09.Do not copy this tutorial or post through any kind of group or claim it as your own. Resemblance to any other tutorial is strictly coincidental.This tutorial was written using psp 9, but should work using any version.It is written assuming you have a basic knowledge of PSP and its tools.
Supplies Needed:
Supplies Needed:
~ The Scrap kit By Jennie D Designs Called:Jdd Stalker it Can be purchased HERE
you can check out her blog HERE
~My template HERE
~My template HERE
~Font of choice, I used 2 peas bad attitude
~DBS Flux~Bight Noise
~a tube of choice,
I used Keith Garvey.
You need a license to use his tubes you can get one at MPT.
Ok......Ready?
1. Open my template, and the paper you are going to use,so you can choose the colors for the template.
2.Starting at the top layer activate the small outlines layer,go to selections and select all selection float and then selections defloat.Fill the outline with a color of your choice.Before you deselect, apply an inner bevel of coice and a drop shadow if you would like.Now deselect.
3.Repeat step 2 on all of the outline layers.
4.Now activate the small rectangles layer.Grab your magic wand and click inside each of the small rectangles.Fill the first rectangle with a color of choice.Fill the Middle rectangleon each side with a lighter shade,and fill the last one on each side with an even lighter shade of the same color.Duplicate this layer twice, so you have 3 layers of the colored rectangles.
5.On the first colored rectangles layer go to your plugins and find Dbs fluxand select bright noise set @ 44 and click mix once.Now repeat on the next colored rectagles layer only hit mix twice. And on the third colored rectangles layer hit mix three times.(To make it easier to animate rename these layers 1,2, and 3)
6.Now activate the layer named top.color this layee with a solid color or a paper of choice.Deselect.Paste one of the heart curtains as a new layer and position it as desired. I resized it twice x 50% before pasting it onto the tag.Add a drop shadowif desired.
7.Now paste your tube of choice as a new layer, resize as needed, add a drop shadow of chioce.
8.acivate the layer named middle, Grab your magic wand and click on the layer.paste your paper into selection.Deselect.
9.Activate the layer named circle, grab your magic wand and clck it inside the circle, fill the circle with a color of choice,I used a gradient.but anything would look great, even another paper.Deselect.
10.Repeat the above step on the long rectangles.When all of the template is colored, make the small outlines layer active,(or your top layer)Paste any elements from the kit that you are going to use.Resize then as desired. I used all of the hearts, I resized them x 50% three times, then I sharpened them.And added a drop shadow to each of them.There is lots of great elements to choose from.
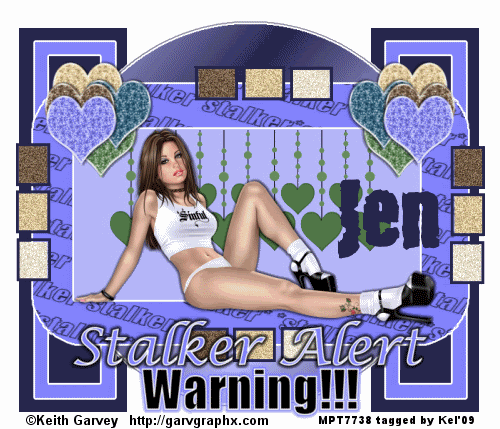
11.Paste the Stalker Alert word art. Resize and position as desired.
12. Now add copywright and your watermark if desired.
13. Now its time to animate and ts very simple.to animate all you need to do is hide 2 and 3 layers, copy merged.Now open animation shop and paste it into animation shop as a new animation.
14.Now go back to psp and hide the 1 and 3 layer, and unhide the 2.Copy merged again and take it back to animation shoppaste it after current frame.
15. go back to psp and hide the 1 and 2 layer and unhide 3.Copy merged and take it back to animation shop again and paste it after current frame.You should have 3 layers in animation shop now.
16. Now your tag is finished except for the name, but view your animation and save it as a blankthen you can use anytime you need a quick tag.
17.Go back to psp and activate your top layer again.Choose your text tool and find your chosen fontadd your name.Convert it to a raster layer and add any effects you would like.I didnt add any effects.copy it and take it to animation shop.Paste it as a new animaton. Copy it again.Then go to edit and propagate paste.Now go back to your tag and activate it. Go to edit and select all. Now go back to edit and paste into selected frames.Position the name as you desire.
18. View animation again and save your finished tag.
Thanks for trying my tut!Hugs from Kel
Ok......Ready?
1. Open my template, and the paper you are going to use,so you can choose the colors for the template.
2.Starting at the top layer activate the small outlines layer,go to selections and select all selection float and then selections defloat.Fill the outline with a color of your choice.Before you deselect, apply an inner bevel of coice and a drop shadow if you would like.Now deselect.
3.Repeat step 2 on all of the outline layers.
4.Now activate the small rectangles layer.Grab your magic wand and click inside each of the small rectangles.Fill the first rectangle with a color of choice.Fill the Middle rectangleon each side with a lighter shade,and fill the last one on each side with an even lighter shade of the same color.Duplicate this layer twice, so you have 3 layers of the colored rectangles.
5.On the first colored rectangles layer go to your plugins and find Dbs fluxand select bright noise set @ 44 and click mix once.Now repeat on the next colored rectagles layer only hit mix twice. And on the third colored rectangles layer hit mix three times.(To make it easier to animate rename these layers 1,2, and 3)
6.Now activate the layer named top.color this layee with a solid color or a paper of choice.Deselect.Paste one of the heart curtains as a new layer and position it as desired. I resized it twice x 50% before pasting it onto the tag.Add a drop shadowif desired.
7.Now paste your tube of choice as a new layer, resize as needed, add a drop shadow of chioce.
8.acivate the layer named middle, Grab your magic wand and click on the layer.paste your paper into selection.Deselect.
9.Activate the layer named circle, grab your magic wand and clck it inside the circle, fill the circle with a color of choice,I used a gradient.but anything would look great, even another paper.Deselect.
10.Repeat the above step on the long rectangles.When all of the template is colored, make the small outlines layer active,(or your top layer)Paste any elements from the kit that you are going to use.Resize then as desired. I used all of the hearts, I resized them x 50% three times, then I sharpened them.And added a drop shadow to each of them.There is lots of great elements to choose from.
11.Paste the Stalker Alert word art. Resize and position as desired.
12. Now add copywright and your watermark if desired.
13. Now its time to animate and ts very simple.to animate all you need to do is hide 2 and 3 layers, copy merged.Now open animation shop and paste it into animation shop as a new animation.
14.Now go back to psp and hide the 1 and 3 layer, and unhide the 2.Copy merged again and take it back to animation shoppaste it after current frame.
15. go back to psp and hide the 1 and 2 layer and unhide 3.Copy merged and take it back to animation shop again and paste it after current frame.You should have 3 layers in animation shop now.
16. Now your tag is finished except for the name, but view your animation and save it as a blankthen you can use anytime you need a quick tag.
17.Go back to psp and activate your top layer again.Choose your text tool and find your chosen fontadd your name.Convert it to a raster layer and add any effects you would like.I didnt add any effects.copy it and take it to animation shop.Paste it as a new animaton. Copy it again.Then go to edit and propagate paste.Now go back to your tag and activate it. Go to edit and select all. Now go back to edit and paste into selected frames.Position the name as you desire.
18. View animation again and save your finished tag.
Thanks for trying my tut!Hugs from Kel


No comments:
Post a Comment