

This tutorial was written by Kelli on 9/15/08.
Do not copy this tutorial or post it through any kind of group or claim it as your own. Resemblance to any other tutorial is strictly coincidental.
This tutorial was written using psp 9, but should work using any version.
It is written assuming you have a basic knowledge of PSP and its tools.
Supplies:
This tut requires Xenofex 2-Constilation.
I also use muras miester copies.
~Tubes of choice I am using Tubes by Myka Jelina.You can purchase these tubes at CILM
~Font of choice
~Scrap kit of choice Or the one I am using by WD Designs.Called:
Special Momentos you can visit her blog here:
You will also need The floor tiles font
And some word art of choice
Ok......Ready?
1. Open supplies in psp Minimize them for now.Open a new canvas 500X500 ~ White.
2.Open 2 papers and minimize them for now.Open your floor tiles font .Grab your text tool, foreground should be null and background is one of the papers you have chosen.Type a lowercase p.Apply the text and go to objects align, center in canvas.(I will refer to this layer as the frame layer)
3.grab your magic wand and click inside the 4 shapes that make up the diamond.Go to selections and modify,expand by 2.Grab your flood fill tool and fill the 4 areas with the other paper.I lowered the opacity on mine to 60.
4.Open the flowers or other elements you are gonna put inside the 5 squares.Paste them as a new layer and add a drop shadow to each.And go to effects, Muras miester copies.I used the default filter with these settings:
5.you will need to use this filter with each element you plan on using.Drag them below the frame layer.Play around with them.I used my lasso tool to select some of the flowers and clusters of flowers. Promoted them to layer and moved them around.To add more flowers to it.you could simply duplicate the flower layers and mirror or flip.
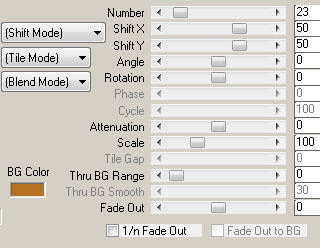
6.Duplicate the frame layer,twice.Go to effects, and find your filter xenofex 2, constilation with these settings apply it to the first frame layer: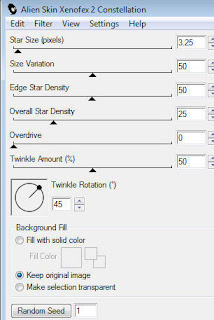
7.repeat the above step on the next 2 frame layers,only clicking on random seed once with each frame layer.
8.Add your elements,and your word art.Add a drop shadow of choiceto each element.Add your tube or tubes at this time.along with your favorite drop shadow
I used 2,2,40,2,black.
9.Add appropriate © and your watermark.
10.If you are happywith how your tag looks then its timeto animate.
11.hide the bottom 2 frame layers,copy merged,paste in animation shop as a new image.Go back to psp and hide the first frame layer and unhidethe middle layer.Copy merged and paste into animation shop after current layer.One last time go to psp and hide the middle layer and unhide the bottom frame layer.copy merged and paste into animation shop after current layer.
12. View animation and save
Thanks for trying my tutorial!
Hugs,Kel


No comments:
Post a Comment