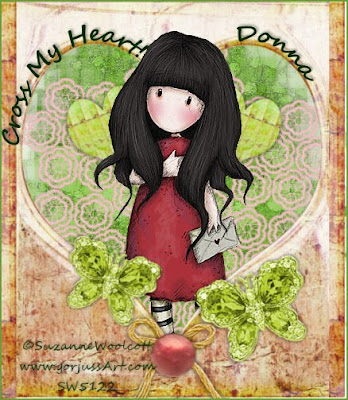
This tutorial was written by Kel on 09/11/2010.
Please do not copy it, post it through any group or claim it as your own.You may link back to my blog.
Any resemblance to any other tutorial is strictly coincidental.
It is written useing psp 9 but should work in any version.
It is written assueming you have a basic knowledge of psp and its tools.
You will need a mask of choice,I used one that comes in psp called
Edge squares.
You will also need a tube.
I am useing a tube by Suzanne Woolcott
you must have a license to use her tubes
you cam purchase one here
You will also need the scrap kit by Jessicas sweet nothings
called Spring Fling which can be purchased here
Check out her blog here
Ok Ready?
1.Open the doily, Shift +D to duplicate. Close the original.
Resize it to 500 pixels high and make sure all layers are checked.
Resize the doily by 85% make sure to uncheck resize all layers.
3.Colorize the doily to a color from your tube.
(an easy way to colorize is to go to adjust-hue and saturation-colorize.
When chosing the color you want to use.Click on your foreground color in the materials pallette on the side.With the materials pallette still open at the bottom you will see 2 columns of numbers.Write down the first two numbers in the second column of numbers. The H and S.Then when you go to colorize just insert those colors into the appropriate boxes click ok and your doily is colorized.)
4.Open a paper of choice and resize it to 900 pixels.I colorized the paper also.Copy it and paste as a new layer onto your image.
Drag it to the bottom.
5.Go to layers-Load save mask from Disc and load your mask.
Merge group and add a drop shadow.
6.Open the heart frame and resize it to 500 pixels high.
7.Copy and paste above the doily layer.
8.Grab your crop tool and crop around the frame layer.You dont want to crop off very much of your frame layer but you dont want any canvas showing around your frame.
9.Open the heart and resize it y 35% once.Copy and paste it below the frame layer.
10.Resize it by 75% three or four times till you are happy with the size.
11.Now rotate it tot he left by 20 degrees.Move it up and over a bit.
Add a drop shadow and duplicate it.
Now mirror the duplicate and position both hearts.
12.Copy and paste your tube as a new layer under the frame layer.
13.With your freehand selection tool draw a selection around her head and right click the tube layer in the layer pallette and promote selection to layer.go back to the tube layer and hit delete on the keyboaard
Select none and moce the promoted selection above the frame layer.
14.Now add the elements of your choice.
I added the button,rope bow and the greeen butterfly.I resized each of them by 35%.And added a drop shadow after they were pasted.
When your happy with the placement of everything add a small border
2 pixels in a color to match your tube.
15.Add your © now.
16.Now grab your presets shape tool set to elipse.
Make your foreground a color and the back ground null.
Draw an oval and use the nodes to shape it like one side of the heart.
Now grab your text tool and move your cursor over the elipse until you see an A with a half circle under it.When you see that you can left click your mouse and start typing.Your text will follow the curve of the circle now.Type "Cross my Heart!"
17.When your happy with the placement of the text go to layer pallette and click on the + on the vector layer.You will see two more layers now.
Click on the eye beside the elipse layer so the circle will not be visible.
Covert to raster now and add your drop shadow.
18.Repeat steps 16 and 17 again for your name.
19.Save as a jpeg.
Thanks for trying my tutorial.
I hope your happy with the results!
Hugs from Kelli













Lovely! Thank you for using my Kit!
ReplyDelete