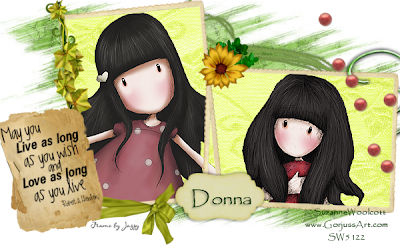
This tutorial was written by Kel on 09/11/2010.
Please do not copy it, post it through any group or claim it as your own.
You may link back to my blog.
Any resemblance to any other tut is strictly coincidental.
It was written useing psp 9 but should work in any other version.
It is written assueming you have a basic knowledge of psp and its tools.
Supplies needed:
My zip file here
included in it is the frame I used
and the mask.
Im very sorry I dont know where I got these.
If you do please email me at purplehearts@live.com
If you do please email me at purplehearts@live.com
and I will give credit or take them down
You will also need one or two tubes, I am using tubes by
Suzanne Woolcott, You can purchase her tubes here
You must have a license number to use her tubes.
You will also need the scrap kit by Jessica's Sweet Nothings
called "Spring Fling",
you may purchase it here
check out her blog here
Ok Ready?
1.Open the frame from my Supplies.Shift+D to duplicate it and
close the original.
2.Resize the frame to 600 pixels wide.Make sure you have
resize all layers checked.
3.Grab your magic wand and click inside all three openings of the frame.
Go to selections and modify and expand x 5 pixels.
4.Add a new layer and move it beelow the frame tube
5.Open a paper from the kit and resize it to 900x900 pixels.
Copy and paste it into selection on the new layer you made.
Select none.
6.Now open another paper and resize it also.
7.Paste it as a new layer onto your tag.Drag it to the bottom.
8.Open the mask I supplied and with the new paper layer the
active layer go to layers-new mask layer-from image.
8.Merge group and duplicate it.Position the two mask layers as desired.
9.Open the 2 tubes you have chosen.Resize them if needed and paste them as new layers.Drag them below the frame layer and position them as desired.
10.Grab your eraser tool and erase the parts of the tubes that are outside of the frame.
11.Open the tag from the kit and resize it x 35%.Copy and paste it as a new layer and move it to the top.Add a drop shadow to it.
12.You may need to resize it again.
13.Now open the button and resize it x 35% twice.Copy and paste it as a new layer and resize it again if desired.Add the same drop shadow to it.
14.When your happy with the size duplicate it several times and position them as desired.
15.Open the twine and resize it x 35%.Copy and paste it as a new layer and drag it below the frame layer and the paper layer below the frame layer.Position the twine so only a small amount of it shows above the frame layer.
16.I also added the leaf garland resized x 35% and positioned so that it looks like its part of the sunflower.
17.Open the heart doodle and resize it x 35%.Copy and paste it under the frame paper layer.
18.Lower the opacity of the frame and frame paper layer so you can see the heart doodle under it.
19.With your freehand selection tool and carefully draw a selection around one of the doodles (Refer to my tag).When you have drawn your selection go to your layer pallette and left click on the doodle layer and promote selection to layer.Now still on the doodle layer hit delete on your keyboard.Select none.Increase te opacity back to 100.
20.On the promoted selection layer drag it above the frame layer.
21.Add your © at this time.
22.Add your name to the tag and add the same drop shadow as before.
23.Save as a png.
Thanks for trying my tut!I hope your happy with the results!
Hugs from Kel
















Love the tut! beautiful work!!! Thank you...
ReplyDelete