Tuesday, July 28, 2009

Let it snow

This tutorial was written by Kelli on 07/28/09.
Do not copy this tutorial or post through any kind of group or claim it as your own. Resemblance to any other tutorial is strictly coincidental.
This tutorial was written using psp 9, but should work using any version.
It is written assuming you have a basic knowledge of PSP and its tools.

Supplies Needed:
~ The Scrap kit By Wench Designs Called :
Xmas In July
it Can be purchased here:

http://sweetnsassydigiscrappers.com/store/index.php?main_page=product_info&cPath=1_106&products_id=3279
you can check out her bog here:
http://wenchdesigns.blogspot.com/
~Font of choice
~a tube of choice, I am using a christmas fairy by Marjolene Gulinski.
You need a license to use her tubes you can get one at mpt.
~And Babes Template #21 which you can download here:
http://babesdesignz.blogspot.com/

Ok......Ready?

1. Open template by babe.
Delete copywright layer
.
grab your crop tool and crop away the excess canvas.

2.make layer 1 the active layer select all, selections float
selections defloat .
open a paper of choice, copy and close the paper,
go back to the tag you are working on and paste into selection.


3.Make layer 2 the active layer and repeat the steps from above.
leave layer 3 alone
.

4.make layer 4 the active layer, go to adjust colorize and colorize the
snowflakes to your desired color
my settings were:
Hue:164 and Saturation:161.


5.Duplicate the snowflakes layer twice, apply
dbs flux bright noise setting at 46.
apply it once to the first layer
twice to the second snowflake layer
and three times to the third snowflake layer.

now sharpen each snowflake layer by going to adjust
sharpen.


6.now make your background layer active,
select all selections float selections deflfloat, selections
modify and contract by 10
selections invert.
add a new layer and move it to the top.
now flood fill with color pattern or grad of choice. Select none.


7.Add youe elemens of choice and add a drop shadow to each of them.
add your tube and add the same drop shadow.


8.type your greeting and add your favorite text effects.
dont forget your copwright.
now add your name and your text effects again.

9.Now its time to animate it.
Hide the second and third snowflake layers and copy merged,
Paste in animation shop as a new animation.
Go back to psp, hide the middle snowflake layer and unhide the bottom
snowflake layer, coy merged again and go back to animation shop and paste
after current frame.
Go back to psp and hide the middle snowflake layer and unhide the top snowflake
layer copy merged, go back to animation shop and paste after current frame.

10.Now view animation and save.

Thanks for trying my tut!
Hugs from Kel

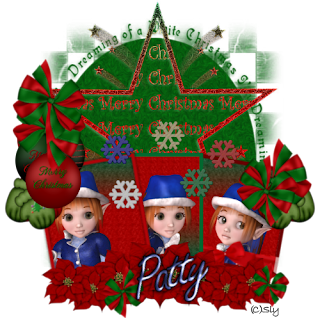
Dreaming of a white christmas


This tutorial was written by Kelli on 07/28/09.
Do not copy this tutorial or post through any kind of group or claim it as your own. Resemblance to any other tutorial is strictly coincidental.
This tutorial was written using psp 9, but should work using any version.
It is written assuming you have a basic knowledge of PSP and its tools.

Supplies Needed:
~ The Scrap kit By Honored Scraps
Called Under the Mistletoe Can be purchased here:
http://sweetnsassydigiscrappers.com/store/index.php?main_page=product_info&cPath=1_38&products_id=1203
you can check out her bog here:
http://honoredscraps.blogspot.com/
~Font of choice
~3 tubes of choice, I am using posers by Sly.
~And These two masks:
these two masks were shared with me, if they are yours and you would like me to take them down please email me and I will take them down.
http://www.4shared.com/file/121356358/3d39d8b6/white_christmas.html

Ok......Ready?
1. Open a new image 600x600 ~transparent.Open a paper of choice, copy.you can close the paper now. Go back o your new image, select all and paste into selection.
Select none, Apply Gabee mask,
Resize the mask layer by 85%

2.Repeat step 1 with the other mask.Position the smaller mask at the top of the larger mask and move it to the top(see my tag for refeence)Sharpen the top mask once and add a drop shadow or grad glow of choice.

3.Open one of the frames,paste onto your tag,resize it so that it fits nicely at the bottom of your tag, duplicate t twice, arrange the three frames as desired.Merge the three frames togther nd with your magic wand, click nsid each of the frames,
expand the selection x 2.

4.Paste a paper of choice as a new layer and drag it below your frame layer, inver your seletion and hit delete on your keyboard. selections select none. paste your tubes a new layers below the frame layers and above the paper layer. Add your copywright and watermark now.


5.Add your elemens of choice, Play arund with them, by duplicating them and resizing, and mirroring them.Add a drop shadow to each element.


6.Add your name along with your favorite text effects.


7.If you added a white background delete it before saving it as png.


Thanks for trying my tutorial!
Hugs,Kel

Wednesday, July 22, 2009

Krafted


This tutorial was written by Kelli on 07/21/09.
Do not copy this tutorial or post through any kind of group or claim it as your own. Resemblance to any other tutorial is strictly coincidental.
This tutorial was written using psp 9, but should work using any version.
It is written assuming you have a basic knowledge of PSP and its tools.

Supplies Needed:
~ The Scrap kit By Urban Mermaid Designs
Called
Krafty Christmas Can be purchaed here:
http://sweetnsassydigiscrappers.com/store/index.php?main_page=product_info&cPath=1_30&products_id=1354
you can check out her bog here
:
http://www.urbanmermaiddesigns.blogspot.com/
~Font of choice,
~A word art from the kit, or one of your choice,
or your favorite quote.
~And a christmas mask of choice

Ok......Ready?
1. Open a new image 600x600 ~transparent.Open a paper of choice, copy.you can close the paper now. Go back o your new image, select all and paste into selection.
Select none, Apply your mask of choice, (A round works best)Merge group.
Resize the mask layer by 85%

2.Open the button frame resize it and copy and paste it onto your tag.

3.When it is sized as you would like, Duplicate it twice,
position the three frames as desired.Merge the three frame layers.
Open a paper of choice, copy and close the paper,

4.Go back to your tag and grab your magic wand, Click inside your
frames, you may have to click several times to get all three
frames selected. Expand your selection by 5.
Add a new layer, below the frames layer and paste into selection.

.
5.Select none and add a drop shadow of choice to the frame layer.

.
6.Add the elements of choice, resizing them and adding a drop shadow to each of them.

7.Add your word art or quote of choice, add a drop shadow of choice.

8.Type your name and add the text effects of choice.

9.Add your copywright and watermark now.

10.If you added a white background delete it before saving it as png.


Thanks for trying my tutorial!
Hugs,Kel

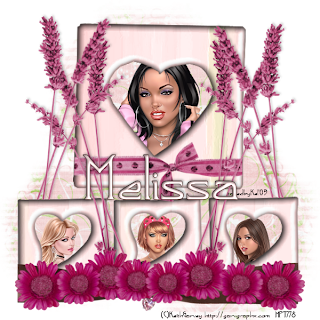
Beau-Ti-Ful Garv


This tutorial was written by Kelli on 07/21/09.
Do not copy this tutorial or post through any kind of group or claim it as your own.
Resemblance to any other tutorial is strictly coincidental.
This tutorial was written using psp 9, but should work using any version.
It is written assuming you have a basic knowledge of PSP and its tools.

Supplies:
~ font of choice
~4 Tubes of choice,I am using the art of Keith Garvey You must purchase a license to use his work you may get one at MPT
~A mask of choice (Around one works best)
~Scrap kit of choice or the one I used:Beau-Ti-Ful Beau by Creative Intuitionz
and can be purchased here:
http://sweetnsassydigiscrappers.com/store/index.php?main_page=product_info&cPath=1_113&products_id=3407
Check out her blog here:
http://creativeintuitionz.blogspot.com/


Ok......Ready?

1.Open a paper of choice, copy it.Close the original.Open a new image,
500x500 pixels, select all and edit paste into selection.Select none.

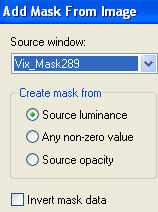
2.Load your mask, and merge group.
Resize the mask by 85%.

3.Open your tubes of choice, I used the ones with the heart cutouts.
Use your eraser tool to erase the ribbons at the top and in the middle of the frames.
Position them as desired. Merge them together, select all, floa and defloat, now
open another paper, resize it to 350x350 pixels, go to effects and apply brush strokes
with the default settings. Copy it, go back to your tag, and paste into selection. Add a drop shadow of choice.

4.Select none, Activate your mask layer, Duplicate it and play around with the mask layers until you are happy with the efects, (I wanted mine to show through the frames)

5.Open your tubes and resize them so they will show nicely inside your frames.
Copy and paste them as new layers behind the frame layer.Use the selection tool, set to rectangle, draw a selection around the heart cutout in your first frame, invert selection. Make our tube layer actie and hit delete on your keyboard.
Repeat with the other tubes.Merge all four tubes nd add a drop shadow.

6.Open the two ribbons you are gona use, resize them and position as desired, use your selection tool or eraser tool to et rid of the ribbons that are outsie of the frames(check out my tag for reference.

7.Now open your elements resize them and paste them onto your tag, position them as desired, add a drop shadow to each.

8.Add your copywright and watermark.

9.Add your name along with any text effects you desire.I added an inner bevel nd a drop sadow.

10. save it as a png

Thanks for trying my tutorial!
Hugs,Kel

Wednesday, July 8, 2009

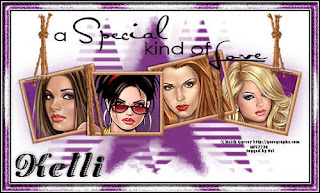
A Special kind of Love


This tutorial was written by Kelli on 07/08/09.
Do not copy this tutorial or post through any kind of group or claim it as your own.
Resemblance to any other tutorial is strictly coincidental.
This tutorial was written using psp 9, but should work using any version.
It is written assuming you have a basic knowledge of PSP and its tools.

Supplies:
~ font of choice
~4 Tubes of choice,I am using the art of Keith Garvey You must purchase a license to use his work you may get one at MPT
~Word art of choice or the one I used:

~A mask of choice or the one I used:

~Scrap kit of choice or the one I used:Purple Fantasy by Scrappy Kreations by Kel
and can be purchased here:
http://sweetnsassydigiscrappers.com/store/index.php?main_page=product_info&cPath=1_26&products_id=375main_page=index&cPath=1_167&sort=2a&page=1
Check out my blog here:
http://angelinadesigns.blogspot.com/
~And template #12 by Simone. I cant provide you with the template but I can link you to her site.
you can download it here:
http://www.sophisticatsimonepsptutorials.com/Templates/SimoneTemplates9.html

Ok......Ready?

1.Open The template and shift D to duplicate it.Close the original.Delete the top layer, the one with the copywright info.

2.Add a new raster layer, and fill it with a paper, or a color to match your tube.Load the mask

and merge group.Use your deform tool to stretch the mask to the edges of your canvas but be sure not to cut off any of the edges of the mask.

3.Make the frames layer the active layer. With your magic wand click inside the first frame, you will have to click more than onceto select all of it. Expand the selection x 2. Paste one of the papers invert selection and hit delete on the keyboard.

4.Select none.Repeat on the rest of the frames.

5.paste your tubes as new layers. repeat the above steps to put the faces inside the frames.

6.Merge down the hanging ropes with the frames, colorize themmy settings were:Hue 19 and sat 126.

7.Add a black border 2 pixels, add a white border also 2 pixels. Add another border 10 pixels and make a light color to match youe tag.Add another white border 2 pixels and another black border 2 pixels.

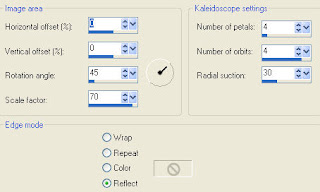
8.grab your magic wand and click inside the colored border, go to effects, reflection effects and apply kaleidoscope:
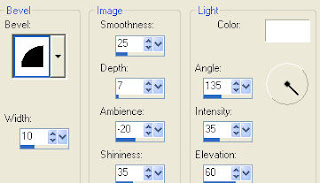
Keep it selected and add an inner bevel:

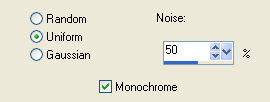
9.Keep it slected and add noise:


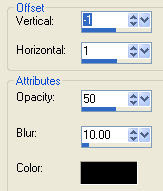
10. Repeat the inner bevel. Add this drop shadow:


11.Select none.Resize your tag, mke sure all layers is checked
I resized mine so rhe width was 500 pixels.

12. Add the Copywright and Watermark, Type your name and apply the same drop shadow as before.

13. Save it as a jpeg.

Thanks for trying my tutorial!
Hugs,Kel

Tuesday, July 7, 2009

Delicate

This tutorial was written by Kelli on 07/08/09.
Do not copy this tutorial or post through any kind of group or claim it as your own. Resemblance to any other tutorial is strictly coincidental.
This tutorial was written using psp 9, but should work using any version.
It is written assuming you have a basic knowledge of PSP and its tools.
Supplies Needed:~ The Scrap kit By Urban Mermaid DesignsCan be purchaed here:http://sweetnsassydigiscrappers.com/store/index.php?main_page=product_info&cPath=1_30&products_id=3323
you can check out her bog here:http://www.urbanmermaiddesigns.blogspot.com/
~Font of choice,
~A word art from the kit, or one of your choice,
or your favorite quote.

Ok......Ready?

1. Open a new image 600x600 ~transparent.Flood fill it with white so you can better see whats going on with your tag.
2.open a paper Resize it 500x500 pixels.
3.Copy and paste The film strip tube as a new layer onto your tag.Give it a drop shadow of choice.
4.Paste your paer below the film strip tube, Use your selection tool, set to recangle to draw a selection around the filmstrip tube, go selections invert, make the paper layer
the active layer and hit delete on your keyboard.
5.Select none and merge the two layers together, rotate the layer by 20 degrees to the right.Duplicate it,
mirror it and position it as desired.
6.Add the elements of choice, resizing them and adding a drop shadow to each of them.
7.Type your name, convert to a raster layer,select all, float, defloat, modify contract x 1.
8.Add an inner bevel of choice, then add noise amount 50 monochrome and uniform ticked.
9.add the same innner bevel again. Select none and then add a drop shadow: 3,3,11,5 black.repeat the drop shadow changing the h and v to -3.
1o.Add your copywright and watermark now.
11.If you added a white background delete it before saving it as png.

Thanks for trying my tutorial!Hugs,Kel

The land of OZ


This tutorial was written by Kelli on 07/08/09.
Do not copy this tutorial or post through any kind of group or claim it as your own. Resemblance to any other tutorial is strictly coincidental.
This tutorial was written using psp 9, but should work using any version.
It is written assuming you have a basic knowledge of PSP and its tools.
Supplies Needed:
~ The Scrap kit By Urban Mermaid Designs
Can be purchaed here:
http://sweetnsassydigiscrappers.com/store/index.php?main_page=product_info&cPath=1_30&products_id=3323
you can check out her bog here:
http://www.urbanmermaiddesigns.blogspot.com/
~Font of choice, Or her alpha tha is included in the scrap kit
~A word art from the kit, or one of your choice.
Ok......Ready?
1. Open a new image 650x250 ~transparent.Flood fill it with white so you can better see whats going on with your tag.
2.open 5 papers resize 2 of them by 25% and the other 3 x 35% Add borders of white to each 10 pixels.
3.Copy and paste each onto your tag.use the deform tool to shape and resize them.Add a drop shadow of choice to each.
4.add the elements of choice, resize them and add a drop shadow to each of them.
5.open a doodle of choice below all the paper layers. add a drop shadow if desired.
6.choose a scripty font and type your name.
7. convert to a raster layer,select all, float, defloat, modify contract x 1.
8.Add an inner bevel of choice, then add noise amount 50 monochrome and uniorm ticked.
9.add the same innner bevel again select noneand then add a drop shadow: 3,3,11,5 black.repeat the drop shadow changing the h and v to -3.
1o.Add your copywright and watermark now.
11.If you added a white background delete it before saving it as png.

Thanks for trying my tutorial!
Hugs,Kel