Saturday, October 31, 2009

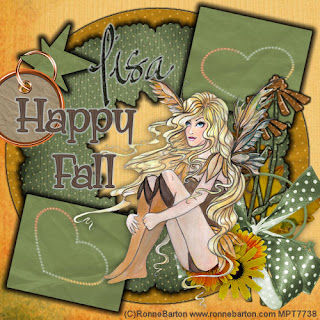
Fall Fairy


This tutorial was written by Kelli on 10/31/09.
Do not copy this tutorial or post through any kind of group or claim it as your own.
Resemblance to any other tutorial is strictly coincidental.
This tutorial was written using psp 9, but should work using any version.
It is written assuming you have a basic knowledge of PSP and its tools.
Supplies Needed:
~ The Scrap kit By Country Girl Creations
called "Fall Frenzy"
it Can be purchased
HERE
~Tube of choice...I used A tube by Ronne Barton.You must purchase a license to use his work.You can get one at MPT
~2 Fonts of choice
~Cadi's tag template
HERE


Ok......Ready?


1. Open Cadi's template.Delete the copwright layer.

2.MakeThe Background layer active Select all , Fill with a paper of choice.I resized the paper I wanted to use to 500 pixels, and pasted into selection)

3.Repeat this for the rest of the layers.

4.Add a Grad glow, black to all the layers of the template.

5.Open the tag 01,
Resize it by 85% and paste it onto your working image.
Position it on your star.Now grab your eraser tool, and erase some of he tag you just pasted, so that it looks like its hanging on the star.

5.Open the elements you are going to use on your tag.
Resize them by 85%. Paste them onto your tag and position as desired.Add a drop shadow to each of them.

6.Paste your tube of choice as a new layer, add a drop shadow to it, add your copywright.

7. Choose your text tool, and one of the fonts you are going to use.
Type your text, I did "Happy Fall",Convert to Raster layer and add a light colored grad glow.

9.Now choose your other font and type your name.Add an inner bevel of choice, now add the default settings for eye candy glass.Add the same grad glow you used for the prevous text.

10.When happy with everything, save it as a jpeg.

Thanks for trying my tut!

Hugs from Kel

Sunday, October 25, 2009

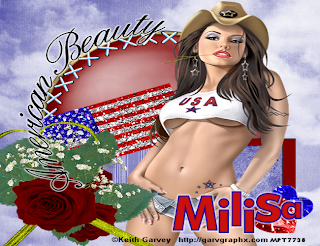
American Beauty


This tutorial was written by Kelli on 10/25/09.Do not copy this tutorial or post through any kind of group or claim it as your own.Resemblance to any other tutorial is strictly coincidental.This tutorial was written using psp 9, but should work using any version.It is written assuming you have a basic knowledge of PSP and its tools.

Supplies Needed:
~ The Scrap kit By Ms. Witchypoo Designs
Called StarsnStripes
it Can be purchased HERE
you can check out her blog HERE
~Tube of choice
I used A tube by Keith Garvey.
You must purchase a license to use his work.You can get one at MPT
~2 Fonts of choice
~eye Candy 4000 Grad glow(optional)

Ok......Ready?

1. Open the paper of choice.Resize it to 500 pixels.Copy and passte it as a new image.Close the original.
2.Open one of the brads, I chose the red one.Resize it to 500 pixels.Copy it and paste it as a new layer.
3.Open element6.Resize, and copy and paste it ontop of the brad.
4.Open element 1resize it and paste it as a new layer.Grab your magic wand tool, and click inside one of the frameson the layer you just pasted. Open one of the papers, resize it to 300 pixels, copy it.Go back to your new tag Make a new raster layer and paste into selection.Select none. Duplicate it three timesMove it the duplicated layers to the rest of the frames.They should be under the red frame layer.I used 2 different papers. 5.Open ele 3 (the flag.)Resize it and copy and paste it. You want it to be really small.Rotate it to the left by 40 degrees.
6.Now open he yellow support ribbon or one of the other ribbons.resize it and copy and past it onto your tag image,position it in the bottom corner of your flag element.
. Now open the red rose, the babies breath and the leeaf, resize all od them to the desired size.I resized all of them to 50 pixels and then resized them again x 75%.Paste them onto your tsg, you may have to resize more,position them how you wwant them to look together,merge them together, duplicate the merged layer, resize it x 85 degrees.Duplicae again and resize again.Position all three layers how you want them and merge them again.So you can position them as one layer. 8.Grab your preset shapes tool, background null,dorsnt matter what color you have as the foreground color.Draw a circle as big as the brad. 9.Dont convert it, grab your text tool, find your chosen scripty font andhover your mouse over the new elipse until you geet the little A icon with the little half circle under it,Type "American Beauty",you may have to add some spaces in front of the text to get the tex where you want it.When it is positioned in the spot you want it go to your layer pallete, click the + sign beside the vector layer, hide the elipse layer, then convert it to a raster layer,Apply your favorite text effects, I did a grad glow,but if you dont have eye candy you can just add a drop shadow.
10.Paste your tube as a new layer, apply a drop shadow of choice, dont forget your copywright.
11.Now select your text tool again and type your name with a different font.Add the same text effects from before.
12.Open the red and blue hearts, resize them, copy and paste them onto your tag.Merge them together,Position them as desired.
13.Save as a jpeg.


Thanks for trying my tut!Hugs from Kel

Saturday, October 24, 2009

Angel Sent


This tutorial was written by Kelli on 10/24/09.

Do not copy this tutorial or post through any kind of group or claim it as your own.

Resemblance to any other tutorial is strictly coincidental.

This tutorial was written using psp 9, but should work using any version.

It is written assuming you have a basic knowledge of PSP and its tools.

Supplies Needed:
~ The Scrap kit By Staceys Designs
Called Precious Baby Girl it Can be purchased HERE or HERE
you can check out her blog HERE
~Tube of choice...I used A tube by Elias Chatzoudis.You must purchase a license to use his work.You can get one at MPT
~Font of choice
~Cadi's tag template HERE

Ok......Ready?

1. Open Cadi's template.Resize it to 500 wide.Delete the copwright layer.

2.Make picture 1 activeelect all float, float the selection, defloat the selection and then fill it with color or paer of choice.I chose a color from the color pallette that is included in the kit.

3.Repeat for the other 3 pictures.

4.Repeat with the circle I filled it with paper6.Add a heavy drop shadow to the pictures and circle. 5.Color the hearts in the same way, add eyecandy glass with the default settings, changing the color to the same color of your hearts.If desired add a drop shadow.

6.Grab your magic wand.Make the rectangle layer the active layer, click inside he outline part of your rectangle.Fill it with a color of choice and add the same glass as before.now Select none, and with your magic wand select the inside of the rectaangle,fill it with a paper or color of choice,I used paper4.

7. Paste your tube of choice as a new layer,position the tube so it is laying on top of the rectangle.Add your copywright. 8.Open the love ribbon, resize it x 75 % 4 times. Copy it and paste it onto your tag position it as desired, refer to my tag if needed. 9.Open the bow ribbon, resize it and paste it as a new layer, poaition it as desired and add the same drop shadow.

10.Open the word art with onsie, with your free hand selection tool.Select the wording only. Copy and paste it onto your tag.Position it inside the rectangle.Add a grad glow.

11.add any more elements you wish.

12.Add your name in a scripty font of choice.Add your favorite text effects.

13.Hide the background layer and save as a png.

Thanks for trying my tut!Hugs from Kel

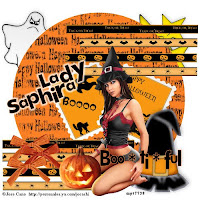
Bootiful


This tutorial was written by Kelli on 10/24/09.
Do not copy this tutorial or post through any kind of group

or claim it as your own.
Resemblance to any other tutorial is strictly coincidental.
This tutorial was written using psp 9, but should work using any version.
It is written assuming you have a basic knowledge of PSP and its tools.
Supplies Needed:
~ The Scrap kit By
LadySaphira Called Trick or Treat
it Can be purchased
HERE
you can check out her blog HERE

~Tube of choice...I used A tube by Jose Cano.
You must purchase a license to use his work.
You can get one at
MPT
~Font of choice


Ok......Ready?

1. Open a new transparent image 500 wide by 500.
2.Open paper of choice Shift + d to duplicate it close the original.

Copy it and paste it onto your workin tag.
3.Grab your preset shapes tool set to elipse.Stroke Null.Background doesnt matter. Draw a large circle in the mddle of the image.
4.Before converting to raster, go to objects, align, center in canvas.Then convert to raster,after its the size you want it.
5.Grab your magic wand, click inside your new circle.Now invert the selection,make your paper layer active, and hit delete on your keyboard.This will get rid of the paper thats outside of your circle.
6.Open the ribbons and resize them to an appropriate size for your tag.
Use as many or as few as you choose.
I wanted to use all 4 of them.
Dulicate them and flip and mirror them.
position as desired. Refer to my tag if desired.
7. Add elements of choice and add a drop shadow to each.
8.Paste your tube as a new layer, resize it as desired.Add a drop shadow of choice.Dont forget to add your copywright.
9.Grab your text tool and find your chosen font
I used 2 peas airplane.Type Boo*ti*ful, Add text effects of choice, I used eye candy 4 to make a small grad glow on the text.
10.Add your name wth the same effect.Rotate the name to the left by 25 degrees.
11.save it as a png.

Thanks for trying my tut!
Hugs from Kel
Friday, October 23, 2009

Misted Fantasy


This tutorial was written by Kelli on 10/23/09.
Do not copy this tutorial or post through any kind of group or claim it as your own.
Resemblance to any other tutorial is strictly coincidental.
This tutorial was written using psp 9, but should work using any version.
It is written assuming you have a basic knowledge of PSP and its tools.

Supplies Needed:
~ The Scrap kit By Tootsie's Creationz Called:
Misted Fantasy
it Can be purchased HERE
you can check out her blog HERE
~Tube of choice...I used a beautiful fairy by Amy Brown.
You must purchase a license to use her work.
You can get one at CILM
~Font of choice

Ok......Ready?
1. Open a new transparent image 500 wide by 500.
Select all.
2.Open paper of choice (I choose paper 7)Shift + d to duplicate it close the original.Go to effects, image effects, offset.Make the settings:Horozontal set @ 0 Vertical set @ 800 custom ticked and repeat ticked. copy it and paste it into selection on your tag.select none.
3.Grab your preset shapes tool set to elipse.Stroke width set at 3.Draw a large circle in the mddle of the image.Your foreground color should be set to a color from your tube back ground set to null.

4.Before converting to raster, go to objects, align, center in canvas.Then convert to raster,apply a bevel of choice.

5.Grab your magic wand, click inside your new circle,modify your selection by expanding x 2.Now invert the selection,make your paper layer active, and hit delete on your keyboard.This will get rid of the paper thats outside of your circle.Rotate the circle to the right x 25 degrees.Go to adjust brightness and contrast, and apply the default settings.

6.Now duplicate your circle layer and on the original circle layer, apply a gausian blur, set at 25.

7. Make your top layer the active layer,select your preset shapes tool again.Same settings as before, only change the line style to Dots.Make another circle just slightly larger than the first one you made.Convert it to a raster layer. and apply the same bevel you used before.

8.Paste your tube as a new layer, resize it as desired.Add a drop shadow of choice.Dont forget to add your copywright.

9.Open element 04 and paste it as a new layer.Drag it below your paper layers.And move it to the corner of your tag Duplicate it and flip and mirror it.So its in the oposite corner.

10.Paste the ribbon 62 as a new layer,resize it as needed.Repeat step 5 to get rid of the ribbon outside of the circle.Move the circles to the top.Use your deform tool to rotate the ribbon.Refer to my tag as a reference.

11.Now add the elements of choice and a drop shadow to each one.

12.Add your name along with your choice of text effects.

13.save it as a png.

Thanks for trying my tut!
Hugs from Kel

Thursday, October 22, 2009

Autumn


This tutorial was written by Kelli on 10/22/09.
Do not copy this tutorial or post through any kind of group or claim it as your own. Resemblance to any other tutorial is strictly coincidental.
This tutorial was written using psp 9, but should work using any version.
It is written assuming you have a basic knowledge of PSP and its tools.
Supplies Needed:
~ The Scrap kit By Horsedreamn Designs Called:

Country Blues
it Can be purchased HERE
you can check out her blog HERE
~My supplies HERE
~Font of choice
~eyecandy (optional)
Ok......Ready?
1. Open a new transparent image 500 wide by 250 tall.
2.open your paper of choice,(I used paper13) resize it to 500 wide.Copy and paste it as a new layer onto your tag.Open my template, copy and paste it as a new layer onto your tag.with the template layer the active layer,go to selections and select all,now go to selecions and invert, make your paper layer the active layer and hit delete on your keyboard,select none.Delete the template layer.
3.Open the doodle 1,resize it to 500 wide.Copy itgo back to your tag image add a new layer, drag it below your paper layer, go to selections and select all.now paste into selection.The doodle you just copied should be under the paper layer.Select none.

4.Open the the flower cluster.resize it to 500 wide.copy and paste it onto your tag and position it as desired.I resized it again by 65%.

5.Open my word art or use your own quote.I used eye candy 4 grad glow to put a smalll glow on it.paste it as a new image.

6.Type your name in your choice of font.I used 2 peas Cherub.


Then I did another grad glow on the name,
you can add your favorite text effects
if you dont have eyecandy.

7. Save it as a png, you will
be able to post it on any color.
If you want to save it as a jpeg, add a layer, move it to the bottom
and fill it with a color of choice before saving.

Thanks for trying my tut!
Hugs from Kel
Tuesday, October 20, 2009

Stalker Alert

(To see the animation click the tag it will take you to the image in my photobucket)

This tutorial was written by Kelli on 10/20/09.Do not copy this tutorial or post through any kind of group or claim it as your own. Resemblance to any other tutorial is strictly coincidental.This tutorial was written using psp 9, but should work using any version.It is written assuming you have a basic knowledge of PSP and its tools.

Supplies Needed:

~ The Scrap kit By Jennie D Designs Called:Jdd Stalker it Can be purchased HERE
you can check out her blog HERE
~My template HERE
~Font of choice, I used 2 peas bad attitude

~DBS Flux~Bight Noise

~a tube of choice,

I used Keith Garvey.

You need a license to use his tubes you can get one at MPT.

Ok......Ready?

1. Open my template, and the paper you are going to use,so you can choose the colors for the template.

2.Starting at the top layer activate the small outlines layer,go to selections and select all selection float and then selections defloat.Fill the outline with a color of your choice.Before you deselect, apply an inner bevel of coice and a drop shadow if you would like.Now deselect.

3.Repeat step 2 on all of the outline layers.

4.Now activate the small rectangles layer.Grab your magic wand and click inside each of the small rectangles.Fill the first rectangle with a color of choice.Fill the Middle rectangleon each side with a lighter shade,and fill the last one on each side with an even lighter shade of the same color.Duplicate this layer twice, so you have 3 layers of the colored rectangles.

5.On the first colored rectangles layer go to your plugins and find Dbs fluxand select bright noise set @ 44 and click mix once.Now repeat on the next colored rectagles layer only hit mix twice. And on the third colored rectangles layer hit mix three times.(To make it easier to animate rename these layers 1,2, and 3)

6.Now activate the layer named top.color this layee with a solid color or a paper of choice.Deselect.Paste one of the heart curtains as a new layer and position it as desired. I resized it twice x 50% before pasting it onto the tag.Add a drop shadowif desired.

7.Now paste your tube of choice as a new layer, resize as needed, add a drop shadow of chioce.

8.acivate the layer named middle, Grab your magic wand and click on the layer.paste your paper into selection.Deselect.

9.Activate the layer named circle, grab your magic wand and clck it inside the circle, fill the circle with a color of choice,I used a gradient.but anything would look great, even another paper.Deselect.

10.Repeat the above step on the long rectangles.When all of the template is colored, make the small outlines layer active,(or your top layer)Paste any elements from the kit that you are going to use.Resize then as desired. I used all of the hearts, I resized them x 50% three times, then I sharpened them.And added a drop shadow to each of them.There is lots of great elements to choose from.

11.Paste the Stalker Alert word art. Resize and position as desired.

12. Now add copywright and your watermark if desired.

13. Now its time to animate and ts very simple.to animate all you need to do is hide 2 and 3 layers, copy merged.Now open animation shop and paste it into animation shop as a new animation.

14.Now go back to psp and hide the 1 and 3 layer, and unhide the 2.Copy merged again and take it back to animation shoppaste it after current frame.

15. go back to psp and hide the 1 and 2 layer and unhide 3.Copy merged and take it back to animation shop again and paste it after current frame.You should have 3 layers in animation shop now.

16. Now your tag is finished except for the name, but view your animation and save it as a blankthen you can use anytime you need a quick tag.

17.Go back to psp and activate your top layer again.Choose your text tool and find your chosen fontadd your name.Convert it to a raster layer and add any effects you would like.I didnt add any effects.copy it and take it to animation shop.Paste it as a new animaton. Copy it again.Then go to edit and propagate paste.Now go back to your tag and activate it. Go to edit and select all. Now go back to edit and paste into selected frames.Position the name as you desire.

18. View animation again and save your finished tag.


Thanks for trying my tut!Hugs from Kel